
To install acoustic foam panels, first, clear the wall surface and mark the placement. Use adhesive strips, spray adhesive, or T-pins to securely attach the panels to the wall.

Creating a serene audio environment is crucial for recording studios, home theaters, and anyone looking to enhance their space’s sound quality. Acoustic foam panels play an essential role in minimizing sound reflections and absorbing unwanted echoes, thereby improving sound clarity.
Installing these panels is a straightforward DIY project that can transform the acoustics of a room. Whether you’re an audio professional, a gaming enthusiast, or simply looking to reduce noise in your living space, setting up acoustic foam correctly is key to achieving optimal sound how to install acoustic foam panels. Follow these steps for a successful installation, and you’ll be well on your way to enjoying a clearer and more controlled audio experience.
Choosing The Right Acoustic Foam Panels
Transforming a chaotic space into a serene audio sanctuary starts with the right acoustic treatment. A critical piece of this sonic puzzle is choosing the right acoustic foam panels for your needs. Not all foams are created equal; selecting the perfect match for your room can turn a cacophony of echoes into a tranquil soundstage. Let’s delve into the essential aspects of selecting the ideal acoustic foam panels for your project.
Understanding The Different Types Of Acoustic Foam Panels
Acoustic foam panels come in various shapes, sizes, and designs, each with its own purpose and acoustic properties.
- Wedge panels: Ideal for absorbing mid to high frequencies.
- Pyramid panels: Enhance the aesthetic while effectively diffusing sound waves.
- Bass traps: These are essential for managing low-frequency sounds typically found in corners.
- Diffractors: Designed to scatter sound waves, reducing flutter echoes and standing waves.
Choosing the correct type of panel involves assessing the specific acoustic challenges your space presents and targeting them with the right design.
Determining The Size And Quantity Needed
Before making a purchase, calculating the appropriate coverage area is paramount. Here’s a quick guide:
- Measure your room’s dimensions (length, width, and height).
- Identify the primary surfaces that require treatment (walls, ceiling, etc.).
- Calculate the total area of these surfaces (in square feet or meters).
- Plan for 25% – 75% coverage of the total surface area, depending on the desired acoustic effect.
An optimal setup balances between sufficient coverage for acoustic control and leaving some reflective surfaces for a lively sound.
Considering The Aesthetic Appeal
Functionality aside, the visual impact of acoustic panels is a consideration that should not be overlooked. The appearance of your space can influence your mood and creativity, hence, aligning acoustic treatment with your personal or brand aesthetic is key. Acoustic foam comes in a rainbow of colors and patterns, which can be mixed and matched to create a functional yet visually pleasing environment. Moreover, custom printed acoustic panels allow you to feature artwork or logos for a unique touch.
Installation Process
Welcome to the step-by-step guide on installing acoustic foam panels, an effective way to enhance the sound quality in any room. You may seek this upgrade for professional recording purposes, creating a dedicated space for your musical endeavors, or simply desiring a noise-controlled environment. Whatever your reasons, proper installation is key to ensuring the best performance of your acoustic foam. Here we’ll break down the installation process into manageable chunks, ensuring you can approach this DIY project with confidence.
Preparing The Wall Surface
Starting with a clean base is crucial for the adhesive to properly bond the acoustic foam to the wall. Follow these steps to prepare the wall:
- Clean the wall surface of any dust, dirt, or grease using a mild detergent and a damp cloth.
- Allow the wall to dry completely before moving to the next step.
- Remove peeling paint or repair any holes and crevices to ensure a smooth, flat surface.
Measuring And Marking The Wall
Accurate placement is essential for both aesthetic and acoustic optimization. Precise measurements and markings will guide you during the installation:
- Use a tape measure to find and lightly mark the wall where you will place the panels.
- Ensure panels are evenly spaced and level by using a laser level or a standard level.
- Sketch a grid pattern on the wall if necessary to serve as a placement guide for multiple panels.
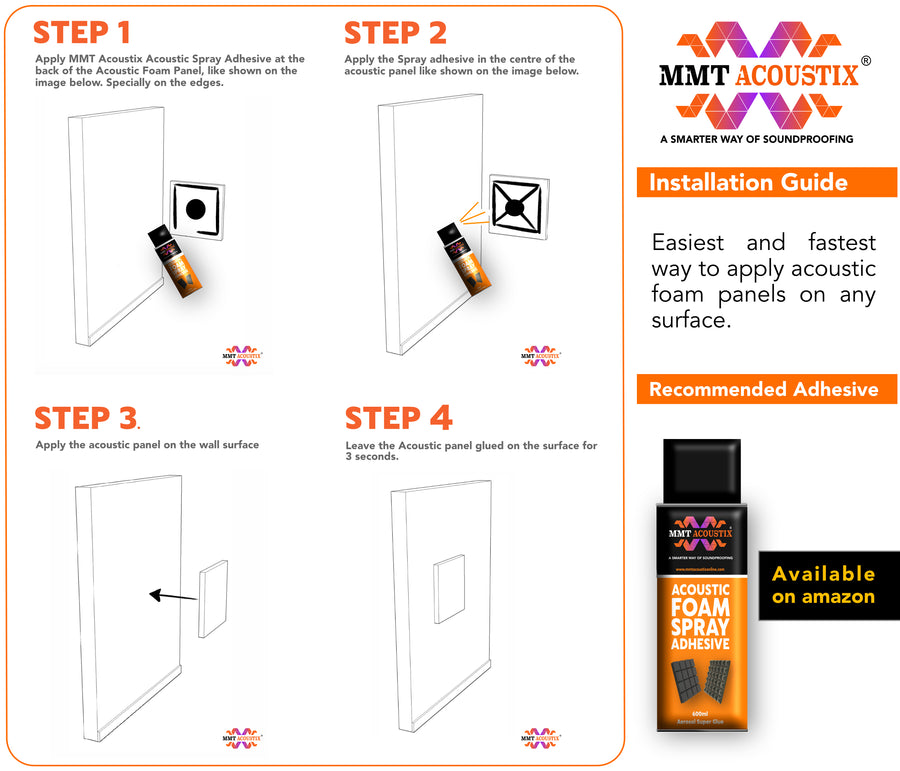
Applying Adhesive
Selecting the right adhesive will ensure your acoustic foam stays securely in place. Always opt for an adhesive designed for use with foam to avoid damage:
- Choose a strong, non-damaging adhesive, such as Command strips, spray adhesive, or double-sided tape.
- Apply the adhesive to the back of the acoustic foam panels, focusing on the edges and center.
- For spray adhesives, maintain a consistent distance as you spray for even coverage.
Mounting The Acoustic Foam Panels
Once the wall is prepped and the foam is ready, it’s time to mount the acoustic foam:
- Align the first panel with your measured and marked guidelines on the wall.
- Press the panel firmly against the wall for a few seconds to ensure a strong bond.
- Continue with the next panel, making sure the edges meet or are evenly spaced according to your design.
Final Touches And Considerations
With the panels in place, let’s focus on the final touches:
- Inspect each panel to ensure it is securely attached and aligned correctly.
- Leave the adhesive to cure for the amount of time recommended by the manufacturer.
- Avoid exposing the panels to direct sunlight or extreme temperatures to maintain their integrity.
- If you encounter any sagging panels, reinforce them with additional adhesive or mounting hardware.

Tips For Effective Soundproofing
Tips for Effective Soundproofing are essential for anyone looking to enhance their audio experience, whether in a home studio, office or entertainment room. Proper soundproofing ensures clarity, removes unwanted noise and echoes, and contributes to the overall acoustic quality of a space. Let’s look at some strategic ways to install acoustic foam panels that will bring out the best in your audio environment.
Placing The Panels Strategically
Strategic placement of acoustic foam panels is critical to achieving optimal soundproofing. Determine the key areas of reflection by conducting a clap test to identify where echoes are coming from. Install panels at these points to absorb unwelcome sound reflections efficiently. Be mindful of parallel walls and ceilings, as these areas can create flutter echoes. Consider using a balanced approach with panels placed symmetrically for consistent sound absorption.
Using Additional Soundproofing Techniques
For enhanced results, complement acoustic panels with other soundproofing techniques. Combining foam panels with bass traps in the corners of your room can significantly reduce low-frequency noise. Include ceiling baffles to handle overhead sounds. If possible, install mass-loaded vinyl (MLV) behind the panels to add extra mass and block sound from entering or leaving the room. Sealing gaps and cracks with acoustic sealants further enhances sound isolation.
Regular Maintenance And Cleaning
Keep your acoustic foam panels in top condition with regular maintenance and cleaning. This prevents dust accumulation, which can affect the panels’ sound-absorbing qualities. Gently vacuum the panels with an upholstery attachment to remove surface dust. For deeper cleaning, use a soft cloth dampened with a mild, soapy solution, and let the panels air dry completely. Remember, maintaining the cleanliness of your foam panels not only preserves their functionality but also extends their lifespan.

Credit: mmtacoustixonline.com
Frequently Asked Questions For How To Install Acoustic Foam Panels
How Do You Attach Foam Acoustic Panels?

Clean the wall surface to ensure strong adhesive bonding. Measure and mark your panel placement for uniformity. Apply adhesive strips or tape to the back of the foam panels. Press the panels firmly against the wall in the marked positions.
Allow time for the adhesive to set.
How Do You Install Acoustic Foam Without Damaging Walls?
To install acoustic foam without wall damage, use temporary adhesive strips, double-sided tape, or Velcro. Mount Command strips are also a secure, wall-friendly option. For a non-adhesive method, use foam mounting panels or frames. Always follow the manufacturer’s instructions for best results.
Should I Put Acoustic Foam Everywhere?
No, you should not cover every surface with acoustic foam. Strategically place it on walls and ceilings based on room acoustics to reduce unwanted echoes and improve sound quality.
Do Acoustic Foam Panels Absorb Sound?
Yes, acoustic foam panels are designed to absorb sound, reducing echo and reverberation in a room for improved audio clarity.
Conclusion
Installing acoustic foam panels effectively enhances your space for better sound quality. Remember, precise placement is key. With proper installation, you’ll notice a significant improvement in your room’s acoustics. Keep experimenting to achieve the best results how to install acoustic foam panels. Enjoy your newly refined audio environment!
