
To install soundproof panels, secure them to the wall using adhesive strips or mounting brackets. Ensure the panels interlock tightly to prevent sound leaks.
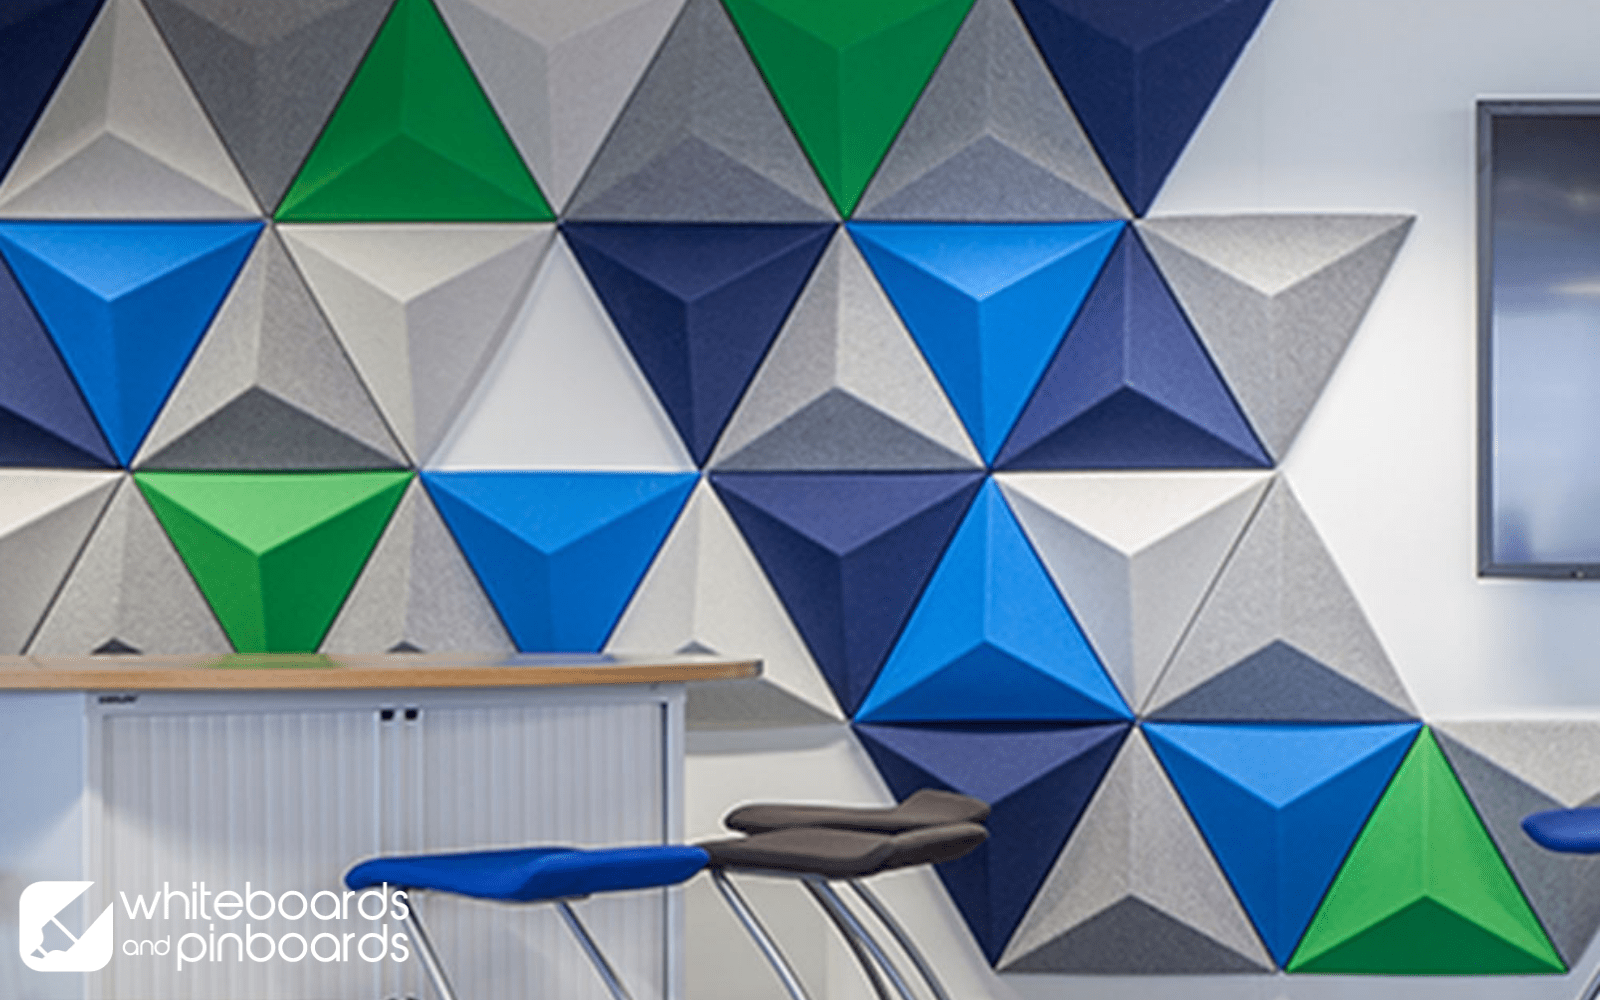
Installing soundproof panels can dramatically improve the acoustic quality of a room, whether it’s for a home cinema, a recording studio, or simply for creating a peaceful environment in your home or office. These specialized panels help reduce noise transfer by absorbing sound waves, making conversations clearer and audio experiences more enjoyable.

Fitting them is relatively straightforward and requires minimal tools. By following the correct installation process, you can achieve professional-level soundproofing. Remember to consider room dimensions and panel placement for optimal effectiveness. With the right preparation and guidance, you can enhance your space for better sound isolation and acoustics how to install sound proof panels.
Credit: m.youtube.com
Benefits Of Installing Sound Proof Panels
Sound proof panels serve as a powerful ally in creating a serene and controlled acoustic environment. Investing in sound proofing solutions carries a multitude of advantages that can enhance the comfort and utility of any space. Whether in a home studio, office, or any room sensitive to noise, the installation of these panels can make a significant difference in your daily life.
Improved Noise Control
Sound proof panels are designed to absorb and dampen noise, providing a solution for unwanted echoes and reverberations. These are essential for:
- Home theaters
- Recording studios
- Commercial spaces
Installing these panels can lead to a marked reduction in noise levels, converting chaotic spaces into zones of tranquility. Homeowners and businesses alike relish the calm and focus a sound-managed room provides.
Increased Privacy
Privacy concerns are paramount in today’s interconnected world. Sound proof panels add an extra layer of seclusion by:
- Minimizing sound leakage
- Preventing eavesdropping
In areas where confidential conversations occur, such as legal offices or medical facilities, enhancing privacy is not just a benefit but a necessity. These panels ensure that sensitive discussions stay within the room’s boundaries.
Enhanced Energy Efficiency
Another hidden gem of installing sound proof panels is the improvement in energy efficiency. Panels provide additional insulation by trapping air and reducing the amount of heat exchange between rooms. This insulation effect contributes to:
| Benefits | Savings |
|---|---|
| Lower heating costs in winter | Financial savings on energy bills |
| Reduced air conditioning needs in summer | Preservation of the environment |
By maintaining a more consistent temperature, sound proof panels not only promote comfort but also encourage fiscal and environmental conscientiousness.
Ensure to provide the reader with clear, concise benefits while avoiding any fluff. The information provided here should be directly related to sound proof panels and presented in an easy-to-read format.
Choosing The Right Sound Proof Panels

Transforming a noisy environment into a serene haven requires more than just sticking any sound proof panels on the walls. It’s about making intelligent choices based on the specific needs of your space.
Determining The Noise Source
Identifying the source of noise is the first critical step in tailoring a soundproofing solution that works. Consider the following aspects:
- Is the noise coming from inside or outside your space?
- Which type of sound is it – airborne (voices, music) or impact (footsteps, machinery)?
Once you’ve pinpointed the noise source, you’re better positioned to select panels designed for that particular sound type.
Understanding Sound Transmission Class (stc) Rating
The STC rating of a soundproof panel indicates its ability to block sound. A higher STC number means the panel is more effective at soundproofing. Use this guideline:
| STC Rating | Soundproofing Capability |
|---|---|
| 25 – 30 | Easily audible conversation |
| 30 – 40 | Loud speech understood fairly well |
| 45 – 60 | Loud speech not understood |
| 60+ | Superior soundproofing, blocks most noises |
Selecting the right STC rating depends on your noise reduction needs.
Evaluating Different Materials
The composition of sound proof panels plays a pivotal role in their performance. Common materials include:
- Foam Panels – Cost-effective, good for absorbing echoes.
- Fiberglass Panels – Higher performance, great for studios.
- Acoustic Wood Panels – Aesthetically pleasing, and offer moderate soundproofing.
- Mass Loaded Vinyl (MLV) – Dense, heavy, and very effective in sound blocking.
Assess the specific attributes of each material to match your soundproofing requirements. Remember, the material determines not only the effectiveness but also the longevity and ultimate cost of your project.
Step-by-step Guide To Install Sound Proof Panels
Seeking a serene atmosphere, free from the chaos of external noise? Implementing sound proof panels is an effective move towards tranquility. Transform any space into an oasis of calm with this straightforward tutorial on installing sound proof panels. With minimal tools and some DIY enthusiasm, you can enhance your acoustic experience. Let’s delve into this journey of upgrading your space for supreme sound quality.
Measuring And Preparing The Room
Before the transformation begins, accurate measurement is crucial. Begin by calculating the total area you need to cover with sound proof panels. Use a tape measure to record the height and width of each wall. Don’t overlook doors, windows, and any irregularities that might require special panel sizes.
- Clear the room of furniture and other obstructions.
- Ensure walls are clean, dry, and free of any debris or damage that could hinder panel adhesion.
- Plot out where each panel will be placed for a consistent and effective layout.
Pro Tip: Sketch a rough diagram for reference during installation, noting the position of electrical outlets and switches.
Selecting The Installation Method
Sound proof panels offer multiple installation options depending on the wall type and panel design. Choosing the right method is pivotal for a lasting setup. Here are some common techniques:
- Adhesive strips work well for temporary installations or with lighter panels.
- Direct wall mounting with screws is ideal for a more permanent solution.
- Using impaling clips can provide robust support for heavier panels.
This decision impacts not only the installation process but also the ease of future panel removal or adjustments. Select a method that harmonizes with your room’s requirements and the product’s specifications.
Installing The Sound Proof Panels
Armed with the right tools and your chosen installation method, you’re all set to install the sound proof panels. Follow these comprehensive steps for a smooth and secure installation:
| Step | Action |
|---|---|
| 1 | Begin with the corner panels, ensuring they are level. |
| 2 | Peel the adhesive backing or prep the impaling clips/screws depending on the installation method. |
| 3 | Press each panel firmly against the wall for solid contact with the adhesive or secure the panels with hardware. |
| 4 | Continue placing panels side by side, ensuring no gaps remain between them. |
| 5 | For custom fits, measure and cut panels to size, taking into account fixtures and fittings. |
Once all the panels are installed, give the room a final once-over. Check each panel for security and make any needed adjustments.
Remember: Patience is key to this process. Take your time to ensure straight lines and even coverage for the best acoustic performance and aesthetic appeal.

Credit: www.amazon.com
Credit: www.whiteboardsandpinboards.com.au
Frequently Asked Questions On How To Install Sound Proof Panels
How Do You Apply Soundproof Panels?
Choose the appropriate soundproof panels for your space. Measure the area and cut panels to fit if necessary. Clean the surface before installation. Apply adhesive on panel backs and press firmly onto the wall. Allow time for the adhesive to set according to product instructions.
How Do You Attach Sound Panels To The Wall?
To attach sound panels to a wall, first mark your panel placements. Use appropriate wall anchors or adhesive strips based on your wall type. Carefully align the panels on the marks and press firmly for secure attachment. Double-check stability before leaving the panels to set.
How Do You Place Sound Panels Effectively?
To place sound panels effectively, identify the room’s reflection points. Mount panels at ear level for optimal absorption, focusing on the ceiling and corners for better acoustics. Arrange symmetrically to maintain balance. Always follow manufacturer instructions for secure and proper installation.
How Do You Install Acoustic Panels Without Drilling?
To install acoustic panels without drilling, use adhesive strips or mounting tape for a secure hold. Try temporary hook-and-loop fasteners for easy removal. Magnet mounting can work if walls contain metal. Utilize tension rods between floor and ceiling if applicable.
Opt for free-standing acoustic panel stands as an alternative.
Conclusion
Soundproofing your space can significantly enhance comfort and privacy. By following the steps detailed above, installing soundproof panels becomes a manageable DIY task. Remember, selecting the right panels and precise positioning are key to effectiveness. For any questions or further tips, feel free to reach out or consult additional resources how to install sound proof panels.
Start your journey to a quieter environment today.